During a forensic investigation, it can often be useful to examine the contents of a Windows Defender quarantine. It is surprising just how many interesting artifacts might reside there, ready to be analyzed.
However, we don’t want to live-boot the image and then manually extract each and every file. Ideally, we would like to automate this process as much as possible, and extract the data offline from a mounted image.
In this post, I’ll briefly describe the Defender quarantine file structure, and a tool I wrote to aid in batch exporting quarantine files. For the purposes of this demo, I will be using a simple eicar.txt file which was deliberately placed into C:\Windows\Temp and subsequently put into quarantine.
Defender File Structure 🔗
Windows Defender stores all of its quarantine related files inside the folderC:\ProgramData\Microsoft\Windows Defender\Quarantine
The contents of this folder has the following structure:
├───Entries
│       {80008A1B-0000-0000-9F06-C4EB67EC5CE2}
├───ResourceData
│   └───5D
│           5D92927E35A6D8FECE000ABB9739F5AEFF914A3E
└───Resources
    └───5D
            5D92927E35A6D8FECE000ABB9739F5AEFF914A3E
All of the files within that folder are encrypted with a custom RC4 cipher. Defender uses a hard-coded static key to obfuscate the quarantine files.
Here is the decryption key at the time of writing this post
0x1E, 0x87, 0x78, 0x1B, 0x8D, 0xBA, 0xA8, 0x44, 0xCE, 0x69, 0x70, 0x2C, 0x0C,
0x78, 0xB7, 0x86, 0xA3, 0xF6, 0x23, 0xB7, 0x38, 0xF5, 0xED, 0xF9, 0xAF, 0x83,
0x53, 0x0F, 0xB3, 0xFC, 0x54, 0xFA, 0xA2, 0x1E, 0xB9, 0xCF, 0x13, 0x31, 0xFD,
0x0F, 0x0D, 0xA9, 0x54, 0xF6, 0x87, 0xCB, 0x9E, 0x18, 0x27, 0x96, 0x97, 0x90,
0x0E, 0x53, 0xFB, 0x31, 0x7C, 0x9C, 0xBC, 0xE4, 0x8E, 0x23, 0xD0, 0x53, 0x71,
0xEC, 0xC1, 0x59, 0x51, 0xB8, 0xF3, 0x64, 0x9D, 0x7C, 0xA3, 0x3E, 0xD6, 0x8D,
0xC9, 0x04, 0x7E, 0x82, 0xC9, 0xBA, 0xAD, 0x97, 0x99, 0xD0, 0xD4, 0x58, 0xCB,
0x84, 0x7C, 0xA9, 0xFF, 0xBE, 0x3C, 0x8A, 0x77, 0x52, 0x33, 0x55, 0x7D, 0xDE,
0x13, 0xA8, 0xB1, 0x40, 0x87, 0xCC, 0x1B, 0xC8, 0xF1, 0x0F, 0x6E, 0xCD, 0xD0,
0x83, 0xA9, 0x59, 0xCF, 0xF8, 0x4A, 0x9D, 0x1D, 0x50, 0x75, 0x5E, 0x3E, 0x19,
0x18, 0x18, 0xAF, 0x23, 0xE2, 0x29, 0x35, 0x58, 0x76, 0x6D, 0x2C, 0x07, 0xE2,
0x57, 0x12, 0xB2, 0xCA, 0x0B, 0x53, 0x5E, 0xD8, 0xF6, 0xC5, 0x6C, 0xE7, 0x3D,
0x24, 0xBD, 0xD0, 0x29, 0x17, 0x71, 0x86, 0x1A, 0x54, 0xB4, 0xC2, 0x85, 0xA9,
0xA3, 0xDB, 0x7A, 0xCA, 0x6D, 0x22, 0x4A, 0xEA, 0xCD, 0x62, 0x1D, 0xB9, 0xF2,
0xA2, 0x2E, 0xD1, 0xE9, 0xE1, 0x1D, 0x75, 0xBE, 0xD7, 0xDC, 0x0E, 0xCB, 0x0A,
0x8E, 0x68, 0xA2, 0xFF, 0x12, 0x63, 0x40, 0x8D, 0xC8, 0x08, 0xDF, 0xFD, 0x16,
0x4B, 0x11, 0x67, 0x74, 0xCD, 0x0B, 0x9B, 0x8D, 0x05, 0x41, 0x1E, 0xD6, 0x26,
0x2E, 0x42, 0x9B, 0xA4, 0x95, 0x67, 0x6B, 0x83, 0x98, 0xDB, 0x2F, 0x35, 0xD3,
0xC1, 0xB9, 0xCE, 0xD5, 0x26, 0x36, 0xF2, 0x76, 0x5E, 0x1A, 0x95, 0xCB, 0x7C,
0xA4, 0xC3, 0xDD, 0xAB, 0xDD, 0xBF, 0xF3, 0x82, 0x53
Entries folder 🔗
Files contained within this folder have a unique GUID as their filename. From each such file we can extract the following information:
- Full path of the original file
- Signature
- Timestamp
- Unique Hash
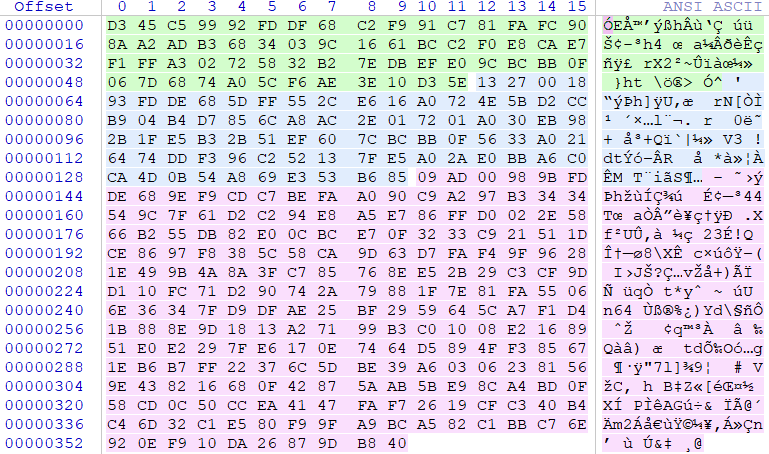
The structure of an Entry file consists of three chunks that are separately encrypted with RC4

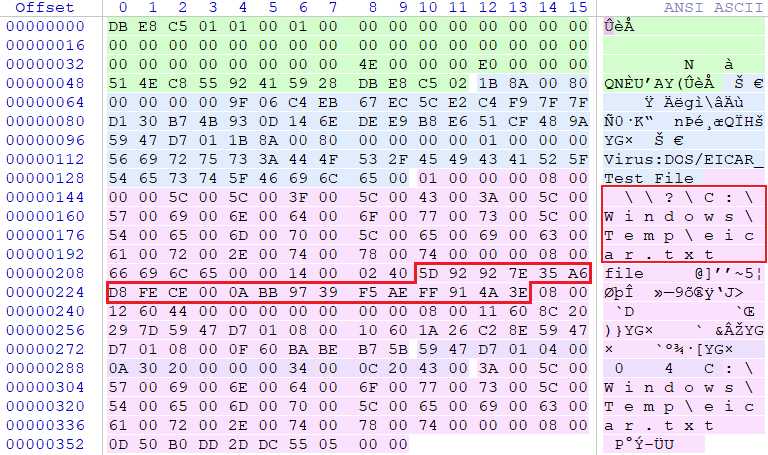
Upon decrypting each chunk:

The second highlighted area is the unique hash, which we can use to find the matching raw-data file in ResourceData folder.
Usually, one Entry file maps to exactly one quarantined file, but this is not always the case. In some cases, an Entry file may contain information about multiple quarantined files. For example, if a whole folder is placed into quarantine in one go, only one Entry file will be created, holding information about all files within that folder.
ResourceData folder 🔗
This is where the actual quarantined files are stored. The filenames are composed of a custom hash, uniquely identifying each sample. Every sample is also grouped into a subfolder, where subfolder name is obtained from the first two characters of a hash.
To decrypt files in this folder, we simply need to apply the RC4 to the whole file.
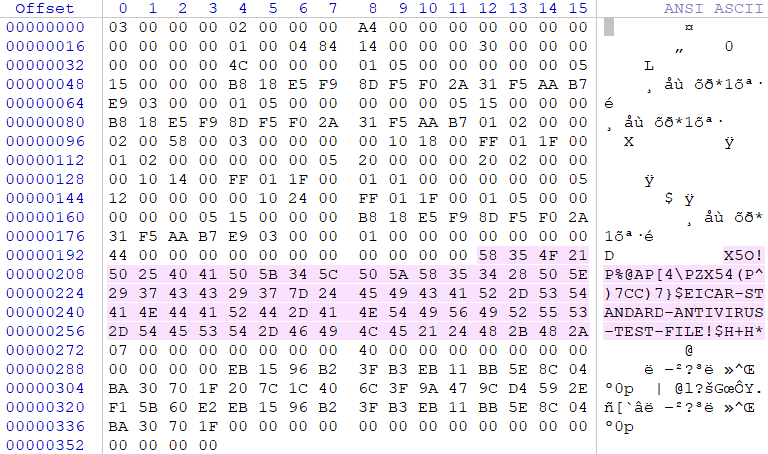
The structure after decrypting file 5D92927E35A6D8FECE000ABB9739F5AEFF914A3E

As seen on the picture, the decrypted file contains some additional metadata at the beginning and end. In order to get the original sample, we need to remove it first.
Resources folder 🔗
This folder is actually not that interesting. It has the same directory structure as ResourceData folder.
Each file contains the quarantined file metadata such as GUID and a HASH. In theory, this could be used to link the Entries files with the corresponding raw files in ResourceData folder. However, from previous analysis, we saw that we have just enough information to link those two without ever touching this folder.
Exporting the Quarantine 🔗
Based on the information above, I wrote this quick and dirty tool to list quarantined files and batch export them.
Usage 🔗
To list the files, specify the root directory of the disk where Defender is installed on
$ python3 defender-dump.py C:\
C:\Windows\Temp\eicar.txt
As you can see, the output is the list of all files with their full path
To export everything, append the --dump flag. This will create a file quarantine.tar in the current folder.
$ python3 defender-dump.py C:\ --dump
Exporting eicar.txt
File 'quarantine.tar' successfully created
$ tar xf quarantine.tar
$ cat eicar.txt
X5O!P%@AP[4\PZX54(P^)7CC)7}$EICAR-STANDARD-ANTIVIRUS-TEST-FILE!$H+H*
That’s it folks! We successfully extracted the contents of a Defender Quarantine
References 🔗
Kudos to these guys for doing most of the hard-work in file format analysis
- Jon Glass’s blog post - https://jon.glass/blog/quarantines-junk
- ERNW Whitepaper 71 - https://static.ernw.de/whitepaper/ERNW-Whitepaper-71_AV_Quarantine_signed.pdf