Information 🔗
Files can always be changed in a secret way. Can you find the flag? cat.jpg
Solution
We can inspect the image metadata using the exiftool
$ exiftool cat.jpg
...
Copyright Notice                : PicoCTF
Application Record Version      : 4
XMP Toolkit                     : Image::ExifTool 10.80
License                         : cGljb0NURnt0aGVfbTN0YWRhdGFfMXNfbW9kaWZpZWR9
Rights                          : PicoCTF
Image Width                     : 2560
Image Height                    : 1598
The License string appears to be base64 encoded.
$ echo cGljb0NURnt0aGVfbTN0YWRhdGFfMXNfbW9kaWZpZWR9 | base64 -d
Flag: picoCTF{the_m3tadata_1s_modified}
Weird File 🔗
What could go wrong if we let Word documents run programs? (aka “in-the-clear”)
Solution
The file weird.docm is a macro-enabled Word document.
We can analyze the embedded macros with the python tool olevba
$ olevba weird.docm
...
Sub runpython()
  Dim Ret_Val
  Args = """" '"""
  Ret_Val = Shell("python -c 'print(\"cGljb0NURnttNGNyMHNfcl9kNG5nM3IwdXN9\")'" & " " & Args, vbNormalFocus)
  If Ret_Val = 0 Then
    MsgBox "Couldn't run python script!", vbOKOnly
  End If
End Sub
...
We see a suspicious subroutine runpython(). This method tries to print the string cGljb0NURnttNGNyMHNfcl9kNG5nM3IwdXN9.
Upon base64 decoding it, we obtain the flag
$ echo cGljb0NURnttNGNyMHNfcl9kNG5nM3IwdXN9 | base64 -d
Flag: picoCTF{m4cr0s_r_d4ng3r0us}
Matryoshka doll 🔗
Matryoshka dolls are a set of wooden dolls of decreasing size placed one inside another. What’s the final one? Image: this
Solution
The file doll.jpg has a mismatched extension. Magic header refers to a PNG file. Let’s fix this.
$ mv dolls.jpg dolls.png
Whoa, there’s our first matryoshka!

After examining the fixed image with exiftool, we see a strange warning:
$ exiftool dolls.png
...
Warning                         : [minor] Trailer data after PNG IEND chunk
Image Size                      : 594x1104
Megapixels                      : 0.656
This implies there might be hidden data appended to the image.
Opening up the image in hexedit and searching for IEND signature reveals the start of another file. The new file begins with the magic header PK, which is a common signature for zip files.
We can run unzip on the dolls.png. The program will attempt to extract any zip files it finds.
$ unzip dolls.png
Archive:  dolls.png
warning [dolls.png]:  272492 extra bytes at beginning or within zipfile
  (attempting to process anyway)
  inflating: base_images/2_c.jpg
Bingo, we got another image (smaller matryoshka). We can repeat this process couple of times, until we get to the final flag.
$ unzip base_images/2_c.jpg
...
$ unzip base_images/3_c.jpg
...
$ unzip base_images/4_c.jpg
warning [base_images/4_c.jpg]:  79578 extra bytes at beginning or within zipfile
  (attempting to process anyway)
  inflating: flag.txt
Flag: picoCTF{4f11048e83ffc7d342a15bd2309b47de}
tunn3l v1s10n 🔗
We found this file. Recover the flag.
Solution
The file itself has no extension. However, the magic header hints it might be a BMP image. BMP’s have a magic header 424D
$ hexdump -C tunn3l_v1s10n | head -1
00000000  42 4d 8e 26 2c 00 00 00  00 00 ba d0 00 00 ba d0  |BM.&,...........|
Renaming the file to tunel_vision.bmp and opening it still fails. The image is probably corrupted.
If we look closely at the binary data on the first line, we can see two intentionally bad 4-byte values. (BAD00000 followed by BAD00000). This is an obvious clue, the header needs to be repaired.
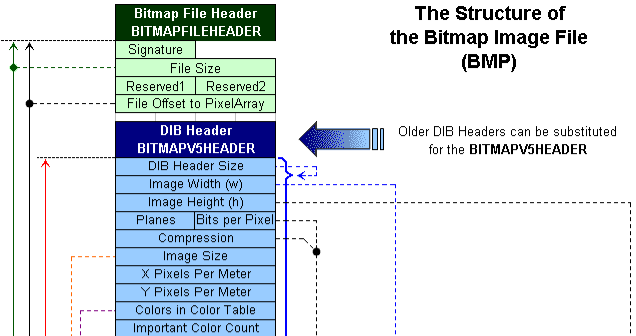
According to BMP documentation, the first 4-byte value represents an offset to the pixel array, while the second represents BMP DIB Header Size.

The DIB Header Size should be a constant, always having the same value, 40 (0x28). The pixel array is located immediately after the DIB Header chunk. So, to jump to raw pixels, we need to skip a total of 14 + 40 bytes (0x36)
After manually editing the pixel data offset to point to 0x36, and setting BMP header size to 0x28, the image finally opens properly. But it’s still not enough. We got trolled

Inspecting this “corrected” image with exiftool reveals one important observation.
The total image size appears to be 2893400 bytes, while the image resolution is only 1134x307 !!
This means we are only seeing a fragment of the image, and there’s more to uncover.
The image width looks just about right. If we can just fix the height to its original value, we might be able to see the complete picture.
To calculate the original height in pixels, we can divide the the total image size in bytes (2893400) by the size of one row in bytes. One row can be calculated as (1134 * 3) + (1134 mod 4) bytes. The 3 stands for 3 bytes for each pixel (rgb), and 1134 mod 4 gives us the additional padding BMP format uses in order to align nicely.
Original height = 2893400 / 3404 = 850px
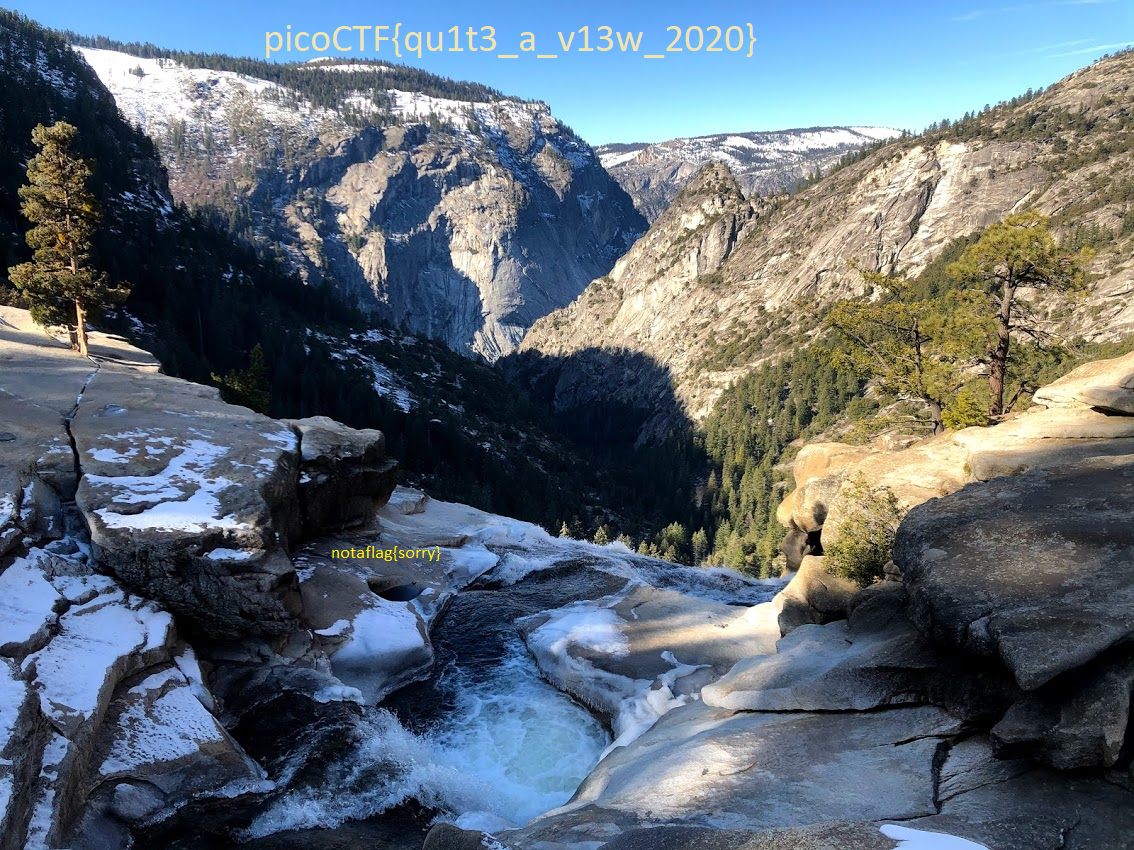
After setting a new height in a hexeditor, we finally get the big picture.

Alternatively, this python snippet does the same thing
import sys
import struct

with open(sys.argv[1], 'rb') as f:
	buffer = bytearray(f.read())

st = struct.Struct('<I')
st.pack_into(buffer, 0x0A, 54)	# Fix pixel array offset
st.pack_into(buffer, 0x0E, 40)	# Fix DIB Header size
st.pack_into(buffer, 0x16, 850)	# Fix image Height property

with open(sys.argv[1] + "_fixed.bmp", 'wb') as f:
	f.write(buffer)

print('File', f.name, 'successfully created')
Flag: picoCTF{qu1t3_a_v13w_2020}
Wireshark doo dooo do doo… 🔗
Can you find the flag? shark1.pcapng
Solution
After digging around for a while, I found the flag in the tcp stream 5
$ tshark -r shark1.pcapng -q -z follow,tcp,ascii,5
HTTP/1.1 200 OK
Date: Mon, 10 Aug 2020 01:51:45 GMT
Server: Apache/2.4.29 (Ubuntu)
Last-Modified: Fri, 07 Aug 2020 00:45:02 GMT
ETag: "2f-5ac3eea4fcf01"
Accept-Ranges: bytes
Content-Length: 47
Keep-Alive: timeout=5, max=100
Connection: Keep-Alive
Content-Type: text/html

Gur synt vf cvpbPGS{c33xno00_1_f33_h_qrnqorrs}
===================================================================
The flag appears to be ROT13 encoded.
$ echo 'cvpbPGS{c33xno00_1_f33_h_qrnqorrs}' | rot13
Flag: picoCTF{p33kab00_1_s33_u_deadbeef}
MacroHard WeakEdge 🔗
I’ve hidden a flag in this file. Can you find it? Forensics is fun.pptm
Solution
The .pptm files are nothing but a glorified zip files. Contents can be extracted using regular unzip
$ unzip 'Forensics is fun.pptm'
  ...
  inflating: ppt/tableStyles.xml
  inflating: docProps/core.xml
  inflating: docProps/app.xml
  inflating: ppt/slideMasters/hidden
The last file looks interesting.
$ cat ppt/slideMasters/hidden
Z m x h Z z o g c G l j b 0 N U R n t E M W R f d V 9 r b j B 3 X 3 B w d H N f c l 9 6 M X A 1 f Q
The output is base64 encoded, separated by spaces.
cat ppt/slideMasters/hidden | tr -d ' ' | base64 -d
Flag: picoCTF{D1d_u_kn0w_ppts_r_z1p5}
Trivial Flag Transfer Protocol 🔗
Figure out how they moved the flag.
Solution
After exporting all files from the pcap, we end up with:
- picture1.bmp
- picture2.bmp
- picture3.bmp
- program.deb
- instructions.txt
- plan
The flag is steganographically hidden inside the picture3.bmp.program.deb is really a debian package of steghide. Both instructions.txt and plan are ROT13 encoded text files containing instructions on how to extract the flag from the image
$ cat instructions.txt plan | rot13
TFTPDOESNTENCRYPTOURTRAFFICSOWEMUSTDISGUISEOURFLAGTRANSFER.FIGUREOUTAWAYTOHIDETHEFLAGANDIWILLCHECKBACKFORTHEPLAN
IUSEDTHEPROGRAMANDHIDITWITH-DUEDILIGENCE.CHECKOUTTHEPHOTOS
The password is: DUEDILIGENCE
$ steghide extract -sf picture3.bmp -p DUEDILIGENCE
wrote extracted data to "flag.txt".
Flag: picoCTF{h1dd3n_1n_pLa1n_51GHT_18375919}
Wireshark twoo twooo two twoo… 🔗
Can you find the flag? shark2.pcapng
Solution
The flag is hidden in the suspicous dns traffic.
Looking closely we see that each DNS query has the form of xxxxxxxx.reddshrimpandherring.com, where xxxxxxxx appears to be part of a larger base64 string.
$ tshark -r shark2.pcapng -T fields -e dns.qry.name dns | tail -15 | uniq
BN9PyNZN.reddshrimpandherring.com
BN9PyNZN.reddshrimpandherring.com.us-west-1.ec2-utilities.amazonaws.com
BN9PyNZN.reddshrimpandherring.com.windomain.local
M9QZU6eP.reddshrimpandherring.com
M9QZU6eP.reddshrimpandherring.com.us-west-1.ec2-utilities.amazonaws.com
M9QZU6eP.reddshrimpandherring.com.windomain.local
fQ==.reddshrimpandherring.com
fQ==.reddshrimpandherring.com.us-west-1.ec2-utilities.amazonaws.com
fQ==.reddshrimpandherring.com.windomain.local
Furthemore, we can narrow down the communication to only this IP address: 18.217.1.57
With a little bit of terminal-fu, we can extract all fragments, reassemble them and decode the final string with this one-liner
$ tshark -r shark2.pcapng -T fields -e dns.qry.name dns and ip.dst == 18.217.1.57 \
| cut -d. -f1 | uniq | tr -d '\n' | base64 -d
Flag: picoCTF{dns_3xf1l_ftw_deadbeef}
Disk, disk, sleuth! 🔗
Use srch_strings from the sleuthkit and some terminal-fu to find a flag in this disk image
Solution
The flag can be retrieved with just one grep
grep -a picoCTF dds1-alpine.flag.img
Flag: picoCTF{f0r3ns1c4t0r_n30phyt3_a6f4cab5}
Disk, disk, sleuth! II 🔗
All we know is the file with the flag is named down-at-the-bottom.txt… Disk image: dds2-alpine.flag.img.gz
Solution
First, let’s inspect the disk layout. We can use fdisk or sleuth’s kit mmls command.
$ mmls dds2-alpine.flag.img
DOS Partition Table
Offset Sector: 0
Units are in 512-byte sectors

      Slot      Start        End          Length       Description
000:  Meta      0000000000   0000000000   0000000001   Primary Table (#0)
001:  -------   0000000000   0000002047   0000002048   Unallocated
002:  000:000   0000002048   0000262143   0000260096   Linux (0x83)
We can clearly see, that the linux partition starts at the sector offset 2048.
Knowing that, let’s use the fls utility to recursively list files starting from offset 2048. We can narrow down the results by grepping just for our file.
$ fls -o 2048 -rF dds2-alpine.flag.img | grep down-at-the-bottom.txt
r/r 18291:	root/down-at-the-bottom.txt
This will return the full path and the inode of the file.
Finally, using icat and passing it the inode above will print out the file contents.
$ icat -o 2048 dds2-alpine.flag.img 18291
Flag: picoCTF{f0r3ns1c4t0r_n0v1c3_f5565e7b}
Surfing the Waves 🔗
While you’re going through the FBI’s servers, you stumble across their incredible taste in music. One main.wav you found is particularly interesting, see if you can find the flag!
Solution
The main.wav contains 16-bit LE values representing amplitudes. We need to transform each 16bit number to a 4bit number, and assemble them together to get any meaningful data.
Transformation is done by first subtracting 1000 from the amplitude, then dividing by 500 while discarding the remainder.
Example:
First amplitude has a value of 2000. So (2000 - 1000) / 500 = 2
Second amplitude has a value of 2501. (2501 - 1000) / 500 = 3
The first output byte is then 0x23, which is # in ASCII.
from scipy.io import wavfile

samplerate, data = wavfile.read('main.wav')

hexed = []
for i in data:
    r = (i - 1000) // 500
    hexed.append(hex(r)[2:])

print(bytearray.fromhex(''.join(hexed)).decode())
The output is a python script used to generate the original wav file. Flag is located at the bottom.
Flag: picoCTF{mU21C_1s_1337_6e0a8181}
Milkslap 🔗
🥛👋
Solution
The flag is steganographically stored inside the image concat_v.png. Extracting 1 least significant bit from each pixel’s blue channel yields the correct flag
We can use the zsteg tool to automate this process
$ zsteg b1,b,lsb,xy concat_v.png
imagedata           .. text: "\n\n\n\n\n\n\t\t"
b1,b,lsb,xy         .. text: "picoCTF{imag3_m4n1pul4t10n_sl4p5}\n"
Flag: picoCTF{imag3_m4n1pul4t10n_sl4p5}
Very very very Hidden 🔗
Finding a flag may take many steps, but if you look diligently it won’t be long until you find the light at the end of the tunnel. Just remember, sometimes you find the hidden treasure, but sometimes you find only a hidden map to the treasure. try_me.pcap
Solution
In the pcap files, we can see a few suspicious GET requests.
GET /NothingSus/duck.png HTTP/1.1
and
GET /NothingSus/evil_duck.png HTTP/1.1
Here are both images exported using tshark


The second image clearly contains some stego data, as it is visibly distorted. However, all known steganography methods fail when attempting to extract the payload.
Getting back to our pcap file and applying a dns filter, we can see some interesting pointers.
The attacker first visited url raw.github.com, followed by powershell.org. This implies attacker was probably browsing some code on github. The second url suggests he was interested in powershell.
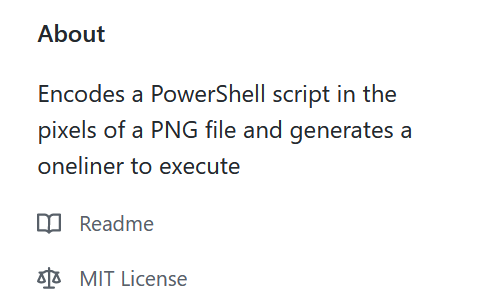
Putting the two and two togeter, we try to search the github for any stego tools written in powershell. Luckily, the first tool with the most stars is the right one: Invoke-PSImage.ps1

This tool will embed any payload inside png images using the 4 least significant bits from the blue and green channels (in that order). After embedding, it provides a one-liner to execute the payload.
I modified the one-liner to only display the extracted payload (instead of executing it)
sal a New-Object; Add-Type -A System.Drawing;
$g=a System.Drawing.Bitmap("C:\Users\nikola\Downloads\Invoke-PSImage\evil_duck.png");
$o=a Byte[] 1223;
(0..0) | % {foreach($x in(0..1222)) {
	$p=$g.GetPixel($x,$_);
	$o[$_*1223+$x]=([math]::Floor(($p.B-band15)*16)-bor($p.G-band15))
}};
$g.Dispose();
[System.Text.Encoding]::ASCII.GetString($o[0..394])
NOTE: You have to temporary disable Defender for it to run.
The above code will extract yet another powershell script from the image.
$out = "flag.txt"
$enc = [system.Text.Encoding]::UTF8
$string1 = "HEYWherE(IS_tNE)50uP?^DId_YOu(]E@t*mY_3RD()B2g3l?"
$string2 = "8,:8+14>Fx0l+$*KjVD>[o*.;+1|*[n&2G^201l&,Mv+_'T_B"

$data1 = $enc.GetBytes($string1)
$bytes = $enc.GetBytes($string2)

for($i=0; $i -lt $bytes.count ; $i++)
{
    $bytes[$i] = $bytes[$i] -bxor $data1[$i]
}
[System.IO.File]::WriteAllBytes("$out", $bytes)
This new script simply xor’s two strings together and stores the final result into flag.txt
Flag: picoCTF{n1c3_job_f1nd1ng_th3_s3cr3t_in_the_im@g3}